.
Your Dry Erase Experts
Est. 1987


 Cleaners & ErasersCork Display StripsDry Erase TapeGlass Board AccessoriesInstallation Hardware KitsMagnetic AccessoriesMarkersMarker TraysWhite Plastic LettersPortable Whiteboard StandVinyl Chart TapeWhiteboard Privacy ScreenCovid Supplies and Floor Vinyl StickersHoliday Whiteboard Magnetsview all > Accessories
 Awesome! - Custom Non-MagneticExcellent! - Custom MagneticPrism-Lock Custom Premium!Printed Floor Decals5' Tall Magnetic ReceptiveCustom Printed VinylDry Erase ChecksPrinted Magnet SheetCustom Lap BoardPrinted PortablePrinted Floor Vinylview all > Custom Printed
 Magnetic CalendarsNon-Magnetic CalendarsRoll Up Calendar MagnetsDry Erase DecalsWeekly CalendarsRefrigerator CalendarsMagic-Tack CalendarsOne Month CalendarsTwo Month CalendarsThree Month CalendarsFour Month CalendarsSix Month CalendarsFull Year Calendarsview all > Calendars
 All Dry EraseMagnetic WhiteboardsNon-Magnetic WhiteboardsFull-Height Dry Erase WallsGlass Dry Erase BoardsColored Dry Erase BoardsCustom PrintedExtra Large White BoardsPortable Freestanding BoardsPersonal Space and Room Dividers Student LapboardsEnclosed WhiteboardsWood Framed BoardsCombination BoardsHorizontal Sliding BoardsReplacement Panels & SkinsResurfacing OptionsRoll Up White Board MagnetsChalkboardsDry Erase Tablesview all > Whiteboards
 Social Distancing Floor DecalCalendars - Dry Erase Refrigerator CalendarsCartesian XY GraphsGrid BoardsIn & Out PlannersLap Boards with PrintsLined BoardsLine Graph BoardMagnetic SheetManuscript LinesMapsMusic Staff - Dry ErasePolar CoordinateSport BoardsHospital / Healthcare BoardsManufacturing BoardsWorkplace Safety BoardsDriver's Educationview all > Graphic Boards
 Peel and Stick ApplicationsProfessional Grade ApplicationsMagnetic ReceptiveClearWith GridsMatte FinishHome Office KitsSmall 2' Wide RollsOpti-Rite® Acrylic PrimerOpti-Rite® Adhesiveview all > Dry Erase Wallpaper
 Wall MountedMusic MagnetsFreestanding WhiteboardsHandheld Music BoardsPeel and Stick Dry Eraseview all > Music
Finally, you can have a quality music staff dry erase board without paying a small fortune for it. These OptiMA® non-magnetic music dry erase boards have our exclusive OptiPrint® dry erase writing surface. You won't find a better board at this price anywhere!
OptiMA® is pleased to introduce our non-magnetic music staff dry erase boards. These are the only non-magnetic music staff boards available on the market and the music staff lines are guaranteed to be permanent.
Created with the exclusive OptiPrint® method, these non-magnetic receptive music staff boards will erase cleanly and neatly every time for years of trouble-free use. The only difference is that you can't use any magnets or magnetic accessories.
Five sets of permanent music lines. The lines are a bold 1/16" thick and spaced 1" apart. There is approximately 5" between each set of music staves and there is about a 4" border at the top and bottom of the music staff boards.
| Model Number | Size | Shipping Method | Shipping Weight | Price Sale Price |
| GR-MS-MA-404 | 4' Tall x 4' W | Truck | 30 lbs | $337.41 |
| GR-MS-MA-406 | 4' Tall x 6' W | Truck | 42 lbs | $420.71 |
| GR-MS-MA-408 | 4' Tall x 8' W | Truck | 56 lbs | $538.86 |
Hi Natalie, thanks so much for the question. I attached a picture of the full instruction sheet. But, basically all you have to do is 1. Measure and lightly mark where you want the board. 2. Mount the L-brackets to the wall. 3. Put the board on the bottom L-brackets. 4. Push the top brackets down flush with the top edge of the board. 5. Screw in the self-tapping screw into the board. Your board should feel secure to the wall. The instructions do come in the installation hardware packet but you can always call us if you get stuck.
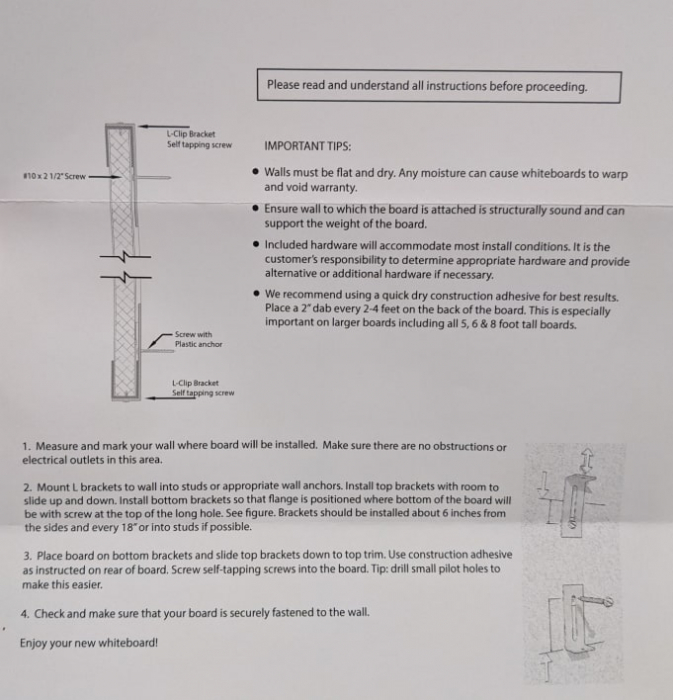
Hi Natalie, thanks so much for the question. I attached a picture of the full instruction sheet. But, basically all you have to do is 1. Measure and lightly mark where you want the board. 2. Mount the L-brackets to the wall. 3. Put the board on the bottom L-brackets. 4. Push the top brackets down flush with the top edge of the board. 5. Screw in the self-tapping screw into the board. Your board should feel secure to the wall. The instructions do come in the installation hardware packet but you can always call us if you get stuck.

We're a Yahoo Five Star Store and we have received Yahoo Pro-Seller and Top Destination Store Awards. You can put your trust in us.

ServiceAlert
We apologize for the inconvenience, but our website is currently down for scheduled maintenance. If you would like to place an order, please call our sales team at 866-366-1500 and they will be happy to assist you. Thank you for your patience and understanding. .
As always, we look forward to serving you. If you have any questions, please feel free to contact us at info@mywhiteboards.com or 866-366-1500.


